Hammerknell. Soulrender Zilas и Vladmal Prime
Рекомендуемый общий уровень снаряжения: 300 hit/focus 200 toughness
Успешность прохождения этого босса зависит в основном от общего урона от рейда и четкого выполнения определенных действий. Несмотря на то, что тактика на этом боссе не очень сложная, сражение с ним простым назвать нельзя.
ХП: 6.8млн
Время на убийство: неизвестно
Лучшая комбинация:
1-2 танка (зависит от того, сможет ли ваш танк подбирать появляющихся мобов, не прекращая танковать босса)
2-3 хиллера (1 рассчитанный на единичную цель, 1-2 на хил по площади)
2 игрока поддержки (1 бард, 1 архонт)
13-15 дамагеров ( как минимум 2 бьющих на расстоянии - предпочтительно с умениями, прерывающими каст, но не обязательно)
Стратегия
Самый важный пункт в убийстве Zilas - это умения разбираться в различных типах монстров, которых он призывает. Среди них будут:
Escaped Butcher, 125тыс. ХП - Урон участников рейда уменьшается на 10% за каждого активного Butcher
Escaped Imp, 62тыс. ХП - Лечит босса умением "Cede Spirit" (прерывается)
Drifting Spirit, 19тыс. ХП - Атакует издалека и использует атаку по площади - "Dark Volley"(прерывается) - если его быстро не убить.
Escaped Magus, 200тыс. ХП - Убивает весь рейд, если позволить ему добраться до середины комнаты и дать скастовать "Purge the Living"
Wrathful Bones, 28тыс ХП - Появляется в больших количествах после каждой "кайтововй" фазы, не представляют особой опасности, если их держит на себе танк.
Для начала все участники рейда должны встать в середину комнаты так, чтобы босс стоял напротив входа, а все сотальные были за его спиной. У босса есть умение. бьющее перед собой, в то время как у мобов ничего подобного нету - поэтому стоять разряженно не обязательно.
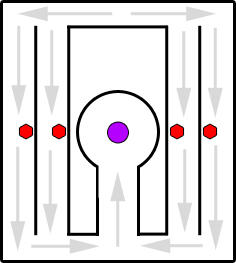
Адды появятся и будут медленно брести к центру комнаты, как показано на рисунке ниже.
С 100% до 80% босс будет призывать только Butchers, Imps, и Spirits. Spirits остановятся на пол пути и начнут кастовать издалека. На каждой стороне у вас должно стоять по одному рдд, которые будут постоянно убивать этих духов. Если их не убивать достаточно быстро, то они начнут использовать АОЭшки - "Dark Volley" - которые можно прервать. Впрочем, урон от этого умения небольшой и легко прохиливается.
Butchers and Imps нужно позволить дойти до середины, чтобы их можно было спокойно залить АОЭ-скиллами. Не забудьте назначит одного игрока, который should be allowed to reach the middle area so that they may be cleaved and AoE'd down on top of the boss. Be sure to assign one interrupter for the Imps, which will always be that person's top priority as well. They should be looking for a spell called Cede Spirit, which has around a 5 second cast time and will heal the boss for 5% if it goes off. A backup interrupter should be assigned as well, but it is pretty rare to have two Imps up at once. Butchers and Imps do not need to be focused down with single-target damage, just be sure to kill them with AoE damage while still working on the boss.
The fight is fairly easy and straight forward until 80%. At that point, the boss will enter a new phase and begin summoning Escaped Magi. The first Escaped Magus will usually reach the half-way point (where the Spirits stop) about 30 seconds after the boss reaches 60%. All DPS that do not have a higher priority responsibility should jump up the stairs and begin attacking the Magus as quickly as possible.
Escaped Magi can be stunned by simply attacking the Stasis Crystal when it is next to it. And you can actually double stun it, as seen below:
(click for larger view)
When the crystal is glowing red it means it is available to be used, when it is glowing green it means the mob is currently stunned, and when it is glowing yellow it means it is currently recharging.
The most difficult part of the fight now comes in determining how long you have to work on the Magi until the boss begins his kite phase. You will have approximately 15 seconds to work on the first add before your entire raid needs to collapse in the middle. You should be able to get the Magus below half health before this happens hopefully, and try to have someone with an instant cast ranged spell stun it a second time as you're running back to the middle. Do not chase the first add beyond the crystal point.
The kite phase is signified by a raid emote that says, "Soulrender Zilas surges with the power of Death!" When this happens, you have approximately 8 seconds to get into position, so do not panic when you first see it.
The boss will channel a beam of death in a clockwise fashion, similar to the last boss in expert CC. If it passes through you it will instantly kill you, but you are given ample warning time to determine where it is going to be positioned.
The white wisp rotating around the room warns you where he will be casting it. Since you have plenty of time before he actually begins channeling the deadly portion of his spell, simply hold still and let the wisp pass through your character once, and then chase it. If done properly, it is incredibly easy to avoid.
The boss will begin casting the "wind-up" portion of Soulrender's Grasp about 3 seconds after the raid emote. This cast is about 5 seconds and is just a warning, and he won't begin channeling the beam until it finishes. After it finishes, he will have around a 10 second cast channel where the whole raid needs to kite around the middle.
Notice the purple circle located directly in the middle: this is deadly as well. Simply chase the beam around in a clockwise fashion while hugging the edge of the purple circle. The entire raid must be on the boss' main platform as well, or they will be insta-killed (even if it looks like they're out of the beam's range).
From here on out it is mostly a matter of mastering the kite phase while managing to keep the Magi under control. The kite phases are exactly 60 seconds apart. This means that whenever a kite phase ends, all of your DPS are free to leave the middle area and chase down any Magi that are up. If you only got a Magus to 50% before having to kite, as soon as it ends you should run to intercept it (before it reaches the middle). You may also have time to jump on the next Magus that spawns early, and chase it all the way until it dies.
When a kite phase is due to happen again (it may take you a few attempts to get a good feel for this), you need to be sure that no one is further away than any of the Stasis Crystals. If someone is in the corner of the room when the kite phase warning appears, they will not have enough time to make it back to the middle. Expect numerous wipes as your raid simply adjusts to and learns the timing on this. Eventually though, you should have zero deaths to the kite phase, and never be letting a Magus reach the middle of the room.
When the boss is at 40% he will also begin stunning random raid members with a Rift Prison type spell. This can be AoE dispelled, but not single-target dispelled. It is not too threatening, as long as the player isn't too far away from the boss when a kite phase is due.
And just when you master the kite phase and Magi, the encounter will throw you another curve ball. At 20%, Zilas will begin deactivating certain Stasis Crystals, as signified by a purple-death-looking animation on them.
You can reactivate these crystals by killing the 19k health Drifting Umbral add that spawns near them, but due to the sheer amount of chaos during this part of the fight that may not always be possible (and they should not be given priority over the Drifting Spirits).
While the Stasis Crystals are deactivated you can no longer stun the Magi, which also makes the fight heavily RNG-dependent. The worst-case-scenario when this happens, would be for a Magus to pass by the middle area during a kite phase. If this happens, it is very unlikely you will be able to kill the Magus in time after the kite phase ends. However, you should only have to deal with 1 Magus during this phase if your raid DPS is high enough.
Once the boss is at around 7%, any Magi that have not already reached a Stasis Crystal should be completely ignored. At this point it just becomes a burn, and you should have most of your raid-wide DPS cooldowns saved for this (or helping you kill a Magus before that). Be sure to not let the Escaped Butchers stack up too much in advance of this burn phase (since they reduce your damage output), but once the boss is 7% you should focus solely on single-target damaging the boss. Also be sure that the Imps continue to be interrupted; having them get off a 5% heal during this final phase would be devastating.
It may seem logical to try and clean up the adds before pushing the boss to 20%, but I would usually recommend against this, simply due to the fact that there is a constant stream of adds and it serves no real purpose. It would be ideal to push the boss to 20% directly following a kite phase, but again, I would not recommend actually stalling DPS to try and do this.
The RNG component comes primarily from when your raid happens to push the boss to 20% (if it's right before a kite phase), and when the Magi spawn compared to when the kite phases happen. As long as the boss is above 7%, whenever a kite phase finishes you should have all available DPS splitting off and chasing down any Magi that are up, whether they just spawned or are nearing the boss' platform.
Ability Summary & Recap
Demonic Presence - Reduces damage output by 10% per stack, one stack for every active Escaped Butcher
Cede Spirit - 5% boss heal cast by Escaped Imps (interruptable)
Dark Volley - Raid-wide AoE damage cast by Drifting Spirits (interruptable)
Purge the Living - Full raid wipe if Escaped Magus allowed to make it to boss platform and cast for 5 seconds (un-interruptable)
Soulrender's Grasp - Clockwise death beam that needs to be kited, 5 second wind-up time, 10 second channel
Soulrender's Rage - Full raid wipe if boss is not properly tanked
Prime
Vladmal Prime is a mini-boss after Zilas on the way to Grugonim. The fights enrage timer is actually a bit difficult, but if you execute the fight properly and don't waste too much DPS swapping to adds you will score a kill fairly quick. The only reason guilds spent a decent amount of time on this boss is due to figuring out the mechanics.
Basic Information
Original difficulty level: 6, current difficulty level: 6
Health: 6.8 million
Hard Enrage Timer: 11 minutes
Ideal Raid Composition
3 Tanks (Two traditional tanks and one who can kite)
5 Healers (2x Senticar, 2x Chloro, 1x Single target)
2 Support (Archon, Bard)
10 DPS
Strategy
Phase 1: Incoming Adds
There is only one phase to this fight really. Just at one point during the fight the boss will start casting a new ability to make the fight a little more difficult.
The most important part of this fight is understanding the adds and what gimmick is attached to them.
Boundless Delver, 126k HP - Have a buff called Heart of the Forge. Causes nearby enemies to take increased damage from Vladmal Prime.
Boundless Excavator, 658k HP - Have a buff called Grinding Servos. Deal major melee damage, do not cleave, and will die over time as long as they have a snare on them (kite).
Boundless Tunneler, 252k HP - Have a buff called Unstable Morphic Field. Tooltip says "this construct's morphic field has become severely unstable." Pretty much means keep away from raid members at all times. Can be crowd controlled and after they break out of the sheep they explode in a 5 meter radius for 80% of the players health.
The aggro radius on this boss is about 75% of his platform and he moves very, very quick. To start the fight the tank wants to aggro first and drag him back to his original position and tank him there the whole fight. The raid should spread out in a half circle around the boss, but should only cover about 1/3rd of the room as the other 2/3rd will be used for the adds.
Shortly after the fight starts a Tunneler will spawn. You should have a mage sitting at the top of the ramp ready to sheep the Tunneler as soon as it spawns. After the sheep breaks the Tunneler will explode in a radius around him for 80% of the players health.
A Delver will spawn second. You want the Delvers to be tanked towards the left side of the room and stick your two senticars on them. Senticars can sit on the Delvers the whole fight and provide massive AoE healing. You may want to sit one pure DPS on them so you never have more than 3, though. They throw spears at random raid members so having too many can cause RNG deaths.
An Excavator will spawn after a Delver. The Excavator's are kited by a rogue tank spec'd for slows, or tanked while a dedicated player slows them. The adds take damage and die over time if they are slowed, and their health pool is too high for DPS to swap to due to the enrage timer. They have no cleave so you can kite the adds wherever you want on the platform.
Starting at 60% the boss will begin to cast Boundless Minions which provides all the adds with a temporary buff for 5 seconds. The Delver's cause you to take even more damage from Vladmal Prime, Excavators cannot be snared, and Tunnelers cannot be sheeped. This is the main reason you use 1/3rd of the room for the raid and 2/3rd for the people dealing with adds.
If you are positioned properly no one will have to worry about Tunneler's being sheeped too late, because the buff will run out long before the Tunneler reaches the raid. Only person who needs to worry about them is the tank kiting. The tank who is kiting needs to watch out for Tunnelers and make sure his range/positioning from the current Excavators is large enough where they can reapply snares before they reach them. Players tanking or DPS'ing the Delvers do not have to worry about anything.
Throughout the fight the boss will cast a debuff on three targets called Ancient Flames. This debuff has a very small radius and causes nearby players to take 1000 damage a second. Make sure your raid is spread out and if it is on melee they need to get out until the debuff is gone.
Also, the boss will cast an ability called Soot Cloud which grants him a 10 second buff that reduces damage taken from ranged and spell attacks. It also fears so melee need to run out every time or they risk getting feared into cleave range. Main tank may need to re-position two or three times during the fight.
The adds begin to spawn faster over time, but you should only ever have 1-3 Excavators and 1-4 Delvers up at any time. If you have more than that then your kiting is off on the Excavator's or the DPS is slow on Delvers. This fight is all about control.
Ability Summary & Recap
Ancient Flames – Cast on three raid members at a time. Deals 1000 damage per second to players around the affected target.
Boundless Minions – Causes the adds to be immune to crowd control effects for 5 seconds.
Soot Cloud - Buff on boss which reduces damage taken from ranged and spell attacks. Also fears nearby enemies.
Spawned Adds:
Boundless Delver – Have a buff called Heart of the Forge which causes nearby enemies to take more damage from Vladmal Prime. Also randomly target raid members and throw spears at them for ~1.5k single target damage.
Boundless Excavator – Have a buff called Grinding Servos which causes them to take damage when snared.
Boundless Tunneler – Have a buff called Unstable Morphic Field which says the add is unstable (keep away from raid members). Blows up after sheep ends.


